I’ve been on a roll with creating hair accessories for Mio, and since a few people have asked about the petal clips that she’s been wearing lately, I thought I’d write a blog post about them. I recently ordered a ZUZII petal clips DIY kit from Etsy, because the hair clips you can make with them are truly adorable, and I loved having the option to make them myself! I was particularly smitten by the colors that were provided, and the reasonable price — at $8 ($10 if you include the $2 shipping), you can create six hair clips. Hair accessories for girls can run pretty steep, and I could easily spend more than that if I were to buy all the materials myself, so I thought this was a pretty good deal.
Everything you need comes in this cute little pouch.
The materials and instructions included in the kit. So awesome that the petals are precut to their various sizes, as that would have been the most annoying and time-consuming part if you were to completely create these from scratch.
They come with the snap clips that the flowers attach to.
A couple of the petal clips in progress…
All six Zuzii petal clips, completed!
Again, I love the colors! A great mix of soft and vibrant colors — Mio will always have something to match her outfits.
I was really happy with the way they turned out! (They’re so cute that I just might sport them in my hair myself… is that allowed? :P) The instructions were really easy to follow, and because the petals were precut, it was very quick and easy to assemble and stitch the flowers and create the hair clips. The best part? When someone asks about the pretty hair clip in your little girl’s hair, you can proudly tell them, “I made it myself!”
I really recommend this kit if you have a little girl and want a fun and easy creative project, or if you want to gift it (either premade by you, or for the recipient to make themselves). The Etsy shop also has a DIY kit for barefoot sandals with the same petals, which would be precious on a newborn, for those with younger baby girls.
One of my favorite parts about having a daughter is all the cute clothes and accessories I can dress her up in. Mio’s hair has been getting long enough lately for her to sport little hair clips and ties, and even though she tends to eventually pull them out of her hair, that doesn’t stop me from trying to put all sorts of cute accessories in her hair. Alas, all the cute hair accessories I have found (my favorite place to find them is Etsy) can get pretty pricey if you get a lot of them, especially considering the fact that Mio often pulls them out and loses them while we’re out and about. So I thought, why not make them? My friend Estella and I have been taking advantage of our funemployment period by having weekly craft days, so I decided to make these felt bow hair clips as one of my projects!
I followed this simple tutorial online, and just attached a hair clip to each of them. You also have the option of attaching them to elastic bands and creating hairbands out of them. It was a lot of fun and they turned out adorable!
So… after discovering how easy they were to make, I ended up making them en masse, so I could have one in every color. (I tend to become a little fanatical when it comes to crafts and DIY…) But aren’t they cute? She’ll always have a bow to match every outfit!
These are a bit big, and measure about 3 inches across, but I’m thinking of making pairs of mini bows for Mio soon, since I still have a lot of felt left over. If you have a little girl, I’d be happy to make some bows for her… or you can try the tutorial yourself! 🙂
Dan and I are both artists who have turned our creative passions into careers, so we’ve always talked about how we wanted to expose Mio to arts and crafts at an early age, in hopes that she’d enjoy being creative, too! We recently bought some painting supplies for her so that we could introduce her to the fun world of painting.
My concern was, of course, the paint. Mio is still in the phase where she puts most things she can get her hands on into her mouth… and I knew with absolute certainty that she’d try to eat the paint that we gave her, too. Thankfully, there are some options for natural, non-toxic, edible paints specifically made for toddlers like Mio. The one I chose was an organic, vegetable-based finger paint set from the company We Can Too. (Apparently it’s gluten-free and dairy-free, too, which wasn’t as huge of a concern to me… but probably even more of a plus for some parents out there!) The paints are a bit pricier than regular finger paints, but they come in powder form which you mix with water, and a little goes a long way! I only used a little bit this time and it was enough, so I think it’ll take us a while to go through all of the paint that came in the set.
The only disadvantage of this paint is that it is slightly grainy because it’s food-based, and is not as highly pigmented and smooth as regular paint. I think it’s a small trade-off if it means ensuring that your child doesn’t accidentally ingest harmful substances, though.
Mixing water into the powder to create the paints.
We took all the supplies outside, and I laid down some plastic and set up an area for her to paint freely, to her heart’s content.
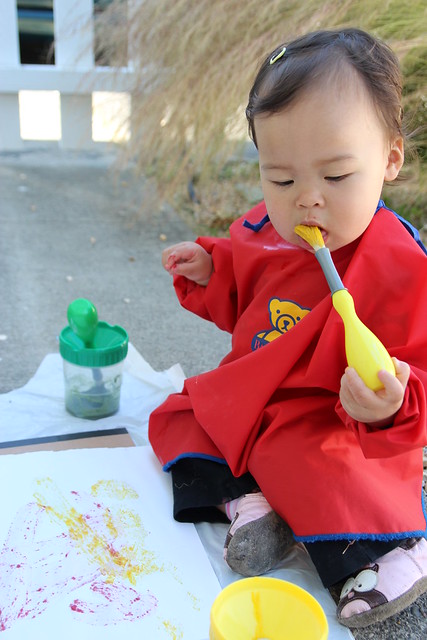
She got the hang of painting immediately, grabbing the handle of the brush and dabbing the paper with paint.
Mio creating her first work of art. Look at her double-fisting the paintbrushes... that's a true artist!
And, as expected, she brings it to her mouth for a taste...
I was impressed by how well she held the paintbrush!
Surprisingly, she knew to put each brush back into the right color. (Most of the time.)
I unscrewed the lids of the paint cups so that Mio could stick her hand in them and finger paint (since the paints are “finger paints,” after all), she mistook it as her cue for her to try eating them.
Literally trying to drink the paint...
She was determined to taste-test each color.
This is precisely why I got these edible veggie paints, because I knew this was going to happen. So I just let her go to town with it and lick the paint all she wanted — fun, uninhibited exploration for Mio, and stress-free supervision for me.
Eventually, after she had taste-tested all four paint colors, she actually came around and started using her hands and fingers to paint. 🙂
Finger painting fun!
"Look at you!" At the end of the painting session, Mio was quite a mess...
...but it was all worth it to see her light up with a smile!
Yay for a fun afternoon of painting!
Clean-up was pretty quick and easy, as we’d been painting outdoors and Mio had been wearing her smock… just had to take the smock off, wash and clean off her face and hands, and bring the supplies inside to wash out. I think it only took about five minutes! We will definitely have to have more art days for our little budding artist… 😀
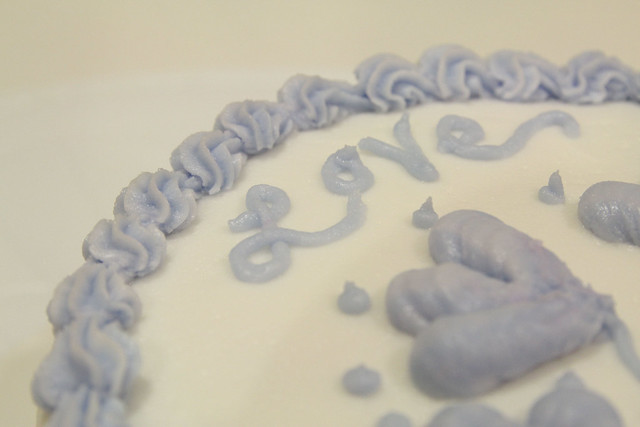
Yesterday evening was the last of my four week cake decorating classes that I’d been taking this past month, and we were asked to design and decorate our own cakes. For my final project, I created this rose cake. I can’t call it perfect, but as an amateur, I’d say this is one of the best decorating jobs I’ve personally ever done. While I love baking, the decorating aspect of cakes and cupcakes has always been a struggle with hit or miss results. Taking this cake decorating course helped me learn some great techniques, which will hopefully lead to better decorating results in my future baking endeavors!
I’m especially thankful for Dan, who encouraged me to take the classes, and who has been my photographer to document my creations along the way, as well as my taste tester. :)Â I feel very lucky to have a husband who is so understanding and supportive of my various creative hobbies and interests!
Baking is one of my favorite hobbies, and I’ve always been interested in taking a formal cake decorating course. Now that I’m at home with Mio, Dan encouraged me to take advantage of the opportunity to enroll in one and have a couple hours to be creative and immerse myself in something fun every week, while he watches Mio after coming home from work. This is my second week in the four-week beginners course, and I love it! Although there are some things that I already know, there’s a lot of new tips and tricks that I’m learning, and it’s really nice to have that short break every week to myself to do something fun and interesting that’s not baby-related.
Here’s the cake I decorated in class this week…
Piped shapes, letters, and borders.
I always wondered how people get the base frosting on the sides and top of the cake so smooth... now I know!
The teacher encouraged us to frost chocolate cakes, because people usually are intimidated with working with chocolate cakes because the crumbs can be so noticeable when they get into the frosting. She showed us that there’s nothing to be afraid of, and that you can still do a seamless, clean job of frosting without getting crumbs all over the frosting!
Double layer chocolate cake, with white almond-flavored frosting.
Even layers of chocolate cake inside.
As for the taste, Dan really enjoyed it! I thought he’d think it was too sweet (which it was), but he said that it tasted surprisingly light. Good thing, because he will be eating more decorated cakes for the next few weeks… 😛
The only negative thing about the course is that there are so many supplies that the course requires, and the supply costs really add up! I’m not sure if I would have signed up had I know how much it would all cost in the end, but there’s no turning back, and in the end, I’m glad I did sign up. At least the supplies will last a very long time, and will come in handy for all the future cakes I make and decorate! (Eventually, I want to take some of the more advanced courses in fondant and gum paste decorations, too!)
I can’t wait to see what we will be learning next class! Special thanks to the hubby for giving me the nudge to go ahead and take the course! Hopefully we’ll see a big improvement in my cakes from hereon! 😀